
acme.sh Applies for an SSL certificate
Table of Contents
acme.sh 使用说明
acme.sh 实现了 acme 协议, 可以从 letsencrypt 生成免费的证书.
主要步骤:
- 安装 acme.sh
- 设置acme.sh自动更新
- 查看acme.sh版本
- 生成证书
- 查看已安装证书信息
- copy 证书到 nginx/apache 或者其他服务
- 更新证书
- 出错怎么办,如何调试
下面详细介绍.
1. 安装 acme.sh
curl https://get.acme.sh | sh -s email=example@gmail.com
[2022年 6月 2日 星期四 10时22分05秒 CST] Installing from online archive.
[2022年 6月 2日 星期四 10时22分05秒 CST] Downloading https://github.com/acmesh-official/acme.sh/archive/master.tar.gz
[2022年 6月 2日 星期四 10时22分12秒 CST] Extracting master.tar.gz
[2022年 6月 2日 星期四 10时22分14秒 CST] It is recommended to install socat first.
[2022年 6月 2日 星期四 10时22分14秒 CST] We use socat for standalone server if you use standalone mode.
[2022年 6月 2日 星期四 10时22分14秒 CST] If you don't use standalone mode, just ignore this warning.
[2022年 6月 2日 星期四 10时22分14秒 CST] Installing to /Users/steven/.acme.sh
[2022年 6月 2日 星期四 10时22分14秒 CST] Installed to /Users/steven/.acme.sh/acme.sh
[2022年 6月 2日 星期四 10时22分14秒 CST] Installing alias to '/Users/steven/.bashrc'
[2022年 6月 2日 星期四 10时22分14秒 CST] OK, Close and reopen your terminal to start using acme.sh
[2022年 6月 2日 星期四 10时22分14秒 CST] Installing cron job
crontab: no crontab for steven
crontab: no crontab for steven
[2022年 6月 2日 星期四 10时22分17秒 CST] Good, bash is found, so change the shebang to use bash as preferred.
[2022年 6月 2日 星期四 10时22分19秒 CST] OK
[2022年 6月 2日 星期四 10时22分19秒 CST] Install success!

source ~/.bashrc
cat ~/.bashrc
. "/Users/steven/.acme.sh/acme.sh.env"
cat /Users/steven/.acme.sh/acme.sh.env
export LE_WORKING_DIR="/Users/steven/.acme.sh"
alias acme.sh="/Users/steven/.acme.sh/acme.sh"2.设置acme.sh自动更新
acme.sh --upgrade --auto-upgrade
[2022年 6月 7日 星期二 15时13分39秒 CST] Installing from online archive.
[2022年 6月 7日 星期二 15时13分39秒 CST] Downloading https://github.com/acmesh-official/acme.sh/archive/master.tar.gz
[2022年 6月 7日 星期二 15时13分44秒 CST] Extracting master.tar.gz
[2022年 6月 7日 星期二 15时13分45秒 CST] It is recommended to install socat first.
[2022年 6月 7日 星期二 15时13分45秒 CST] We use socat for standalone server if you use standalone mode.
[2022年 6月 7日 星期二 15时13分45秒 CST] If you don't use standalone mode, just ignore this warning.
[2022年 6月 7日 星期二 15时13分45秒 CST] Installing to /Users/steven/.acme.sh
[2022年 6月 7日 星期二 15时13分45秒 CST] Installed to /Users/steven/.acme.sh/acme.sh
[2022年 6月 7日 星期二 15时13分45秒 CST] Good, bash is found, so change the shebang to use bash as preferred.
[2022年 6月 7日 星期二 15时13分46秒 CST] OK
[2022年 6月 7日 星期二 15时13分46秒 CST] Install success!
[2022年 6月 7日 星期二 15时13分49秒 CST] Upgrade success!
3.查看acme.sh版本
acme.sh --version
https://github.com/acmesh-official/acme.sh
v3.0.5
4.生成证书
我之前使用默认Server,也就是zerorssl证书,总是报错。
acme.sh  --register-account  -m example@gmail.com --server zerossl
Usage: _hmac hashalg secret [outputhex]
[2022年 6月 7日 星期二 16时59分12秒 CST] Registering account: https://acme.zerossl.com/v2/DV90
[2022年 6月 7日 星期二 16时59分28秒 CST] Register account Error: {"type":"urn:ietf:params:acme:error:malformed","status":400,"detail":"[External Account Binding] The JWS Signature MUST be present"}

example@gmail.com 为你的zerossl账号,不要随意填写邮箱!
Supported CA:
- ZeroSSL.com CA(default)
- Letsencrypt.org CA
- BuyPass.com CA
- SSL.com CA
- Google.com Public CA
- Pebble strict Mode
- Any other RFC8555-compliant CA
我在 https://github.com/acmesh-official/acme.sh/issues/3472 上也看到了类似的问题
还有这个:https://github.com/acmesh-official/acme.sh/issues/3106 ,这篇帖子中的意思是说macos的openssl默认使用LibreSSL,进行认证的时候会有一些问题,目前还没有看到解决方案。
最后的解决方法就是加上--server letsencrypt参数,不使用zerossl 这个CA,而是使用letsencrypt这个CA
关于ZeroSSL 和 Let’s Encrypt的功能比较,可以查看以下链接:
https://zerossl.com/letsencrypt-alternative/
下面开始申请证书:
acme.sh --issue --dns dns_ali -d imepisode.top --server letsencrypt
[2022年 6月 2日 星期四 17时10分27秒 CST] Using CA: https://acme-v02.api.letsencrypt.org/directory
[2022年 6月 2日 星期四 17时10分27秒 CST] Single domain='imepisode.top'
[2022年 6月 2日 星期四 17时10分27秒 CST] Getting domain auth token for each domain
[2022年 6月 2日 星期四 17时10分29秒 CST] Getting webroot for domain='imepisode.top'
[2022年 6月 2日 星期四 17时10分30秒 CST] Adding txt value: zKq4VEWx8gP1-D1GjxmfIoB2ZwIedtTFmgKZseiuaSw for domain:  _acme-challenge.imepisode.top
[2022年 6月 2日 星期四 17时10分33秒 CST] The txt record is added: Success.
[2022年 6月 2日 星期四 17时10分33秒 CST] Let's check each DNS record now. Sleep 20 seconds first.
[2022年 6月 2日 星期四 17时10分54秒 CST] You can use '--dnssleep' to disable public dns checks.
[2022年 6月 2日 星期四 17时10分54秒 CST] See: https://github.com/acmesh-official/acme.sh/wiki/dnscheck
[2022年 6月 2日 星期四 17时10分54秒 CST] Checking imepisode.top for _acme-challenge.imepisode.top
[2022年 6月 2日 星期四 17时10分56秒 CST] Domain imepisode.top '_acme-challenge.imepisode.top' success.
[2022年 6月 2日 星期四 17时10分56秒 CST] All success, let's return
[2022年 6月 2日 星期四 17时10分56秒 CST] Verifying: imepisode.top
[2022年 6月 2日 星期四 17时10分57秒 CST] Pending, The CA is processing your order, please just wait. (1/30)
[2022年 6月 2日 星期四 17时11分01秒 CST] Success
[2022年 6月 2日 星期四 17时11分01秒 CST] Removing DNS records.
[2022年 6月 2日 星期四 17时11分01秒 CST] Removing txt: zKq4VEWx8gP1-D1GjxmfIoB2ZwIedtTFmgKZseiuaSw for domain: _acme-challenge.imepisode.top
[2022年 6月 2日 星期四 17时11分06秒 CST] Removed: Success
[2022年 6月 2日 星期四 17时11分06秒 CST] Verify finished, start to sign.
[2022年 6月 2日 星期四 17时11分06秒 CST] Lets finalize the order.
[2022年 6月 2日 星期四 17时11分06秒 CST] Le_OrderFinalize='https://acme-v02.api.letsencrypt.org/acme/finalize/569911696/94092013026'
[2022年 6月 2日 星期四 17时11分07秒 CST] Downloading cert.
[2022年 6月 2日 星期四 17时11分07秒 CST] Le_LinkCert='https://acme-v02.api.letsencrypt.org/acme/cert/04416803a84e8e337fa045be2f78ba529128'
[2022年 6月 2日 星期四 17时11分08秒 CST] Cert success.
-----BEGIN CERTIFICATE-----
省略
-----END CERTIFICATE-----
[2022年 6月 2日 星期四 17时11分08秒 CST] Your cert is in: /Users/steven/.acme.sh/imepisode.top/imepisode.top.cer
[2022年 6月 2日 星期四 17时11分08秒 CST] Your cert key is in: /Users/steven/.acme.sh/imepisode.top/imepisode.top.key
[2022年 6月 2日 星期四 17时11分08秒 CST] The intermediate CA cert is in: /Users/steven/.acme.sh/imepisode.top/ca.cer
[2022年 6月 2日 星期四 17时11分08秒 CST] And the full chain certs is there: /Users/steven/.acme.sh/imepisode.top/fullchain.cer
5.查看已安装证书信息
acme.sh --info -d imepisode.top
DOMAIN_CONF=/Users/steven/.acme.sh/imepisode.top/imepisode.top.conf
Le_Domain=imepisode.top
Le_Alt=no
Le_Webroot=dns_ali
Le_PreHook=
Le_PostHook=
Le_RenewHook=
Le_API=https://acme-v02.api.letsencrypt.org/directory
Le_Keylength=2048
Le_OrderFinalize=https://acme-v02.api.letsencrypt.org/acme/finalize/569911696/94092013026
Le_LinkOrder=https://acme-v02.api.letsencrypt.org/acme/order/569911696/94092013026
Le_LinkCert=https://acme-v02.api.letsencrypt.org/acme/cert/04416803a84e8e337fa045be2f78ba529128
Le_CertCreateTime=1654161068
Le_CertCreateTimeStr=2022-06-02T09:11:08Z
Le_NextRenewTimeStr=2022-08-01T09:11:08Z
Le_NextRenewTime=1659258668
6.copy 证书到 nginx/apache 或者其他服务
这部分我就不重复写了,可以查看官方文档:
https://github.com/acmesh-official/acme.sh/wiki/说明
7.更新证书
目前证书在 60 天以后会自动更新, 你无需任何操作. 今后有可能会缩短这个时间, 不过都是自动的, 你不用关心.
请确保 cronjob 正确安装, 看起来是类似这样的:
crontab  -l

56 * * * * "/root/.acme.sh"/acme.sh --cron --home "/root/.acme.sh" > /dev/null
8. 出错怎么办,如何调试
如果出错, 请添加 debug log:
acme.sh --issue ..... --debug或者:
acme.sh --issue ..... --debug 2请参考: https://github.com/Neilpang/acme.sh/wiki/How-to-debug-acme.sh
最后, 本文并非完全的使用说明, 还有很多高级的功能, 更高级的用法请参看其他 wiki 页面.
https://github.com/Neilpang/acme.sh/wiki
阿里云说明
1.创建RAM用户
登陆https://ram.console.aliyun.com/users平台,点击""身份管理-用户-创建用户"
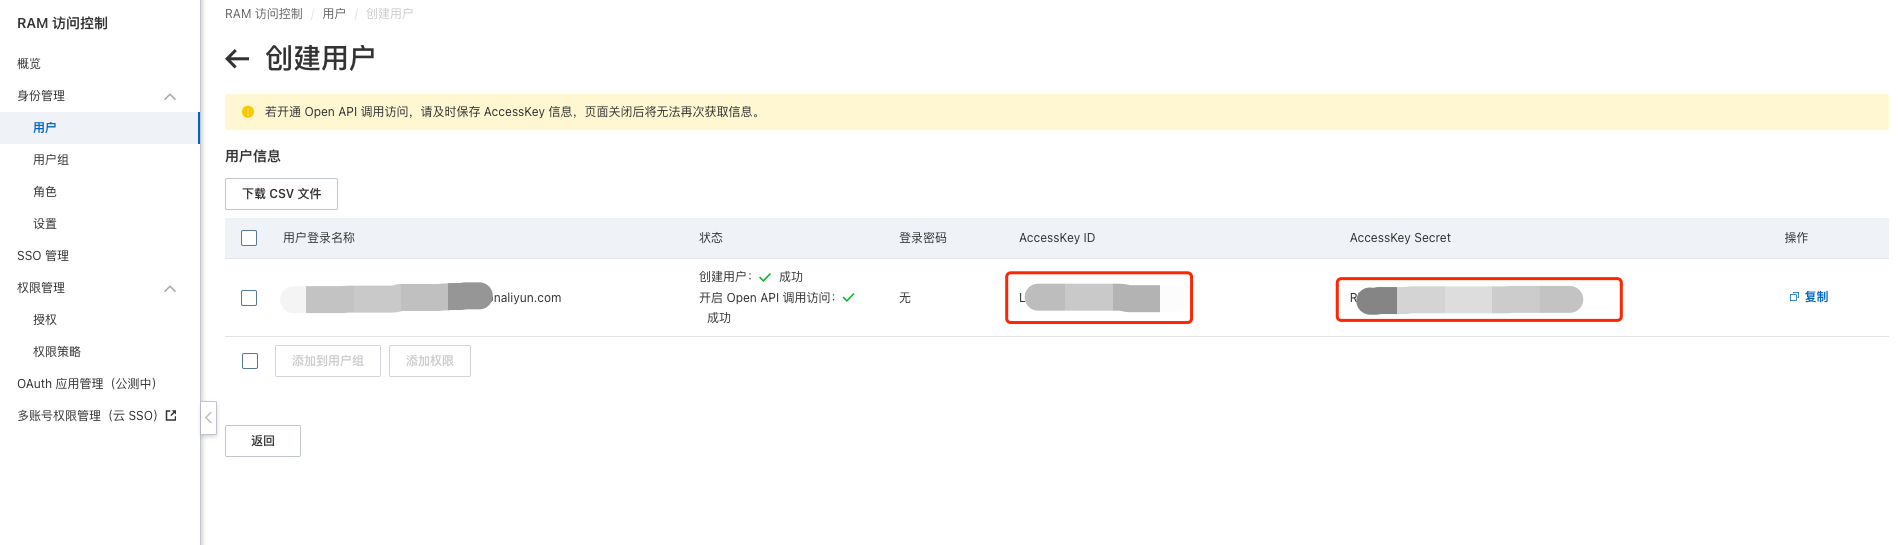 aliyun ram
注:点击“复制” 按钮,复制保存AccessKey和SecretKey,创建用户只显示一次AccessKey和SecretKey!!!一定要保存好!否则只能再次重新创建用户了。
2.添加RAM权限
给新添加的RAM用户添加权限,我们需要的是 “管理云解析(DNS)的权限”,我一开始添加成了“管理域名服务的权限”,导致生成证书的时候报错:无法创建dns txt记录。
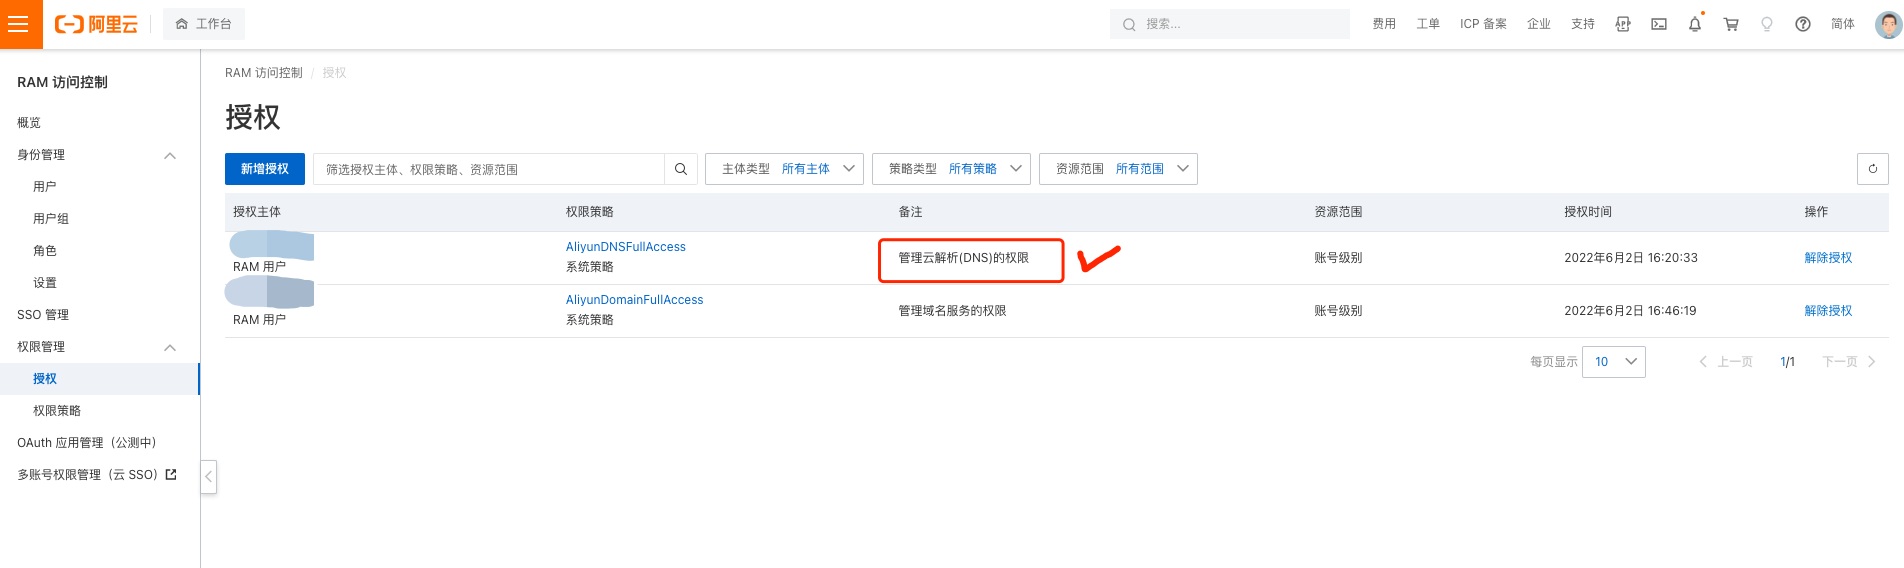 aliyun ram
3.配置RAM API key
vim ~/.acme.sh/account.conf
export Ali_Key="sdfsdfsdfljlbjkljlkjsdfoiwje"
export Ali_Secret="jlsdflanljkljlfdsaklkjflsa"
The Ali_Key and Ali_Secret will be saved in ~/.acme.sh/account.conf and will be reused when needed.
ZeroSSL 证书申请
1.申请证书之前,建议先在ZeroSSL官方网站:https://zerossl.com/ 注册账号
2.另外注意,如果您通过ZeroSSL官网在线申请SSL证书,免费账户是有3个域的额度限制的,但通过acme.sh申请则没有这个限制,所以建议使用acme.sh进行申请,简单方便。
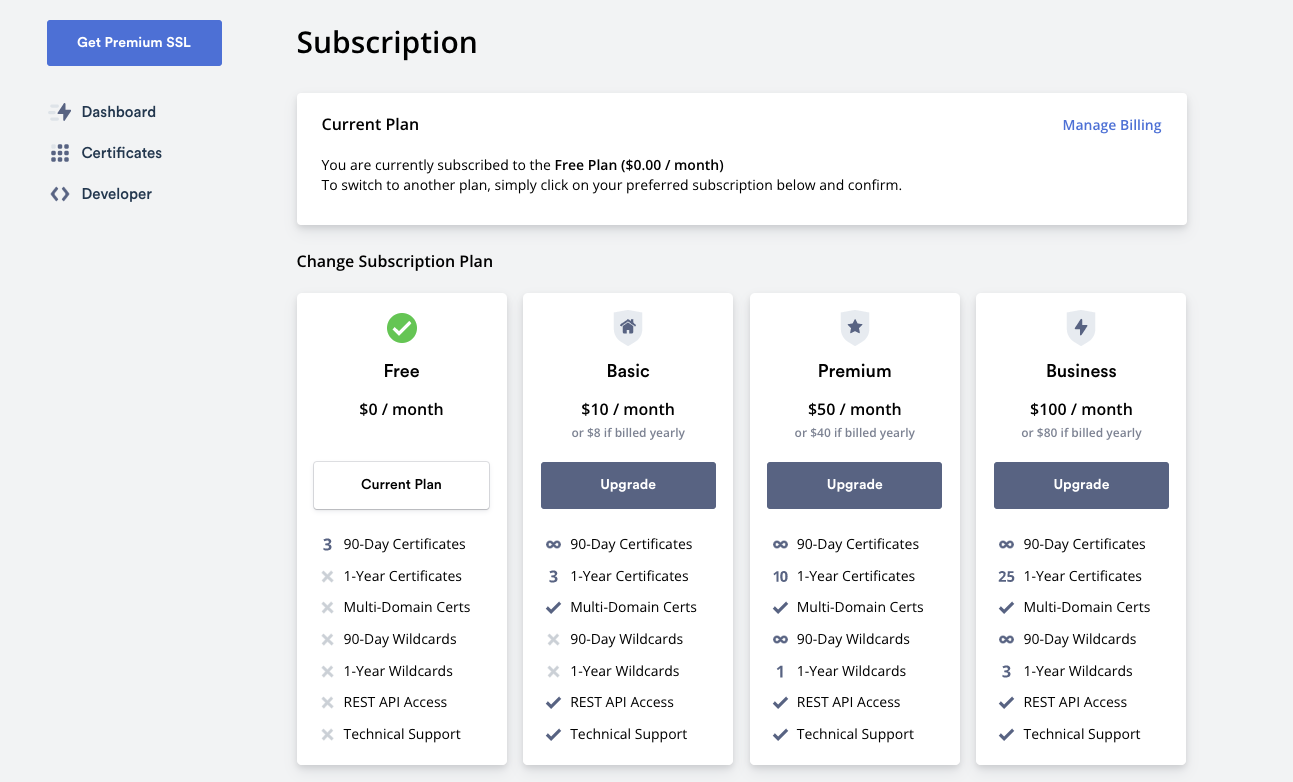 套餐说明
套餐说明
3.在网站上申请证书,认证方式有三种:
3.1. Email Verification(邮箱)
3.2. DNS(CNAME)
3.3. HTTP File Upload
 证书申请认证方式
第一种验证方式,邮箱只能从列表中选择,无法自定义邮箱后缀的,如下图所示:
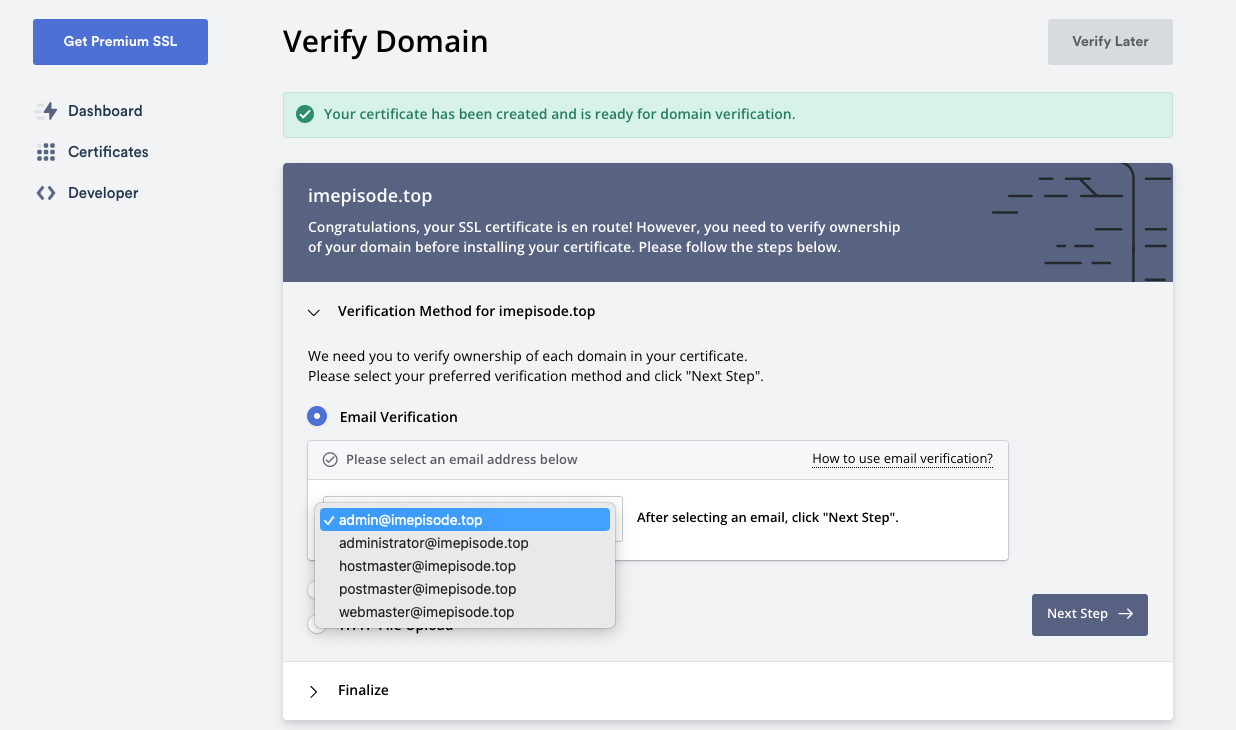 邮箱认证方式
我使用的第二种方式,需要在aliyun上先配置一个dns cname的解析,如下图所示会有配置示例:
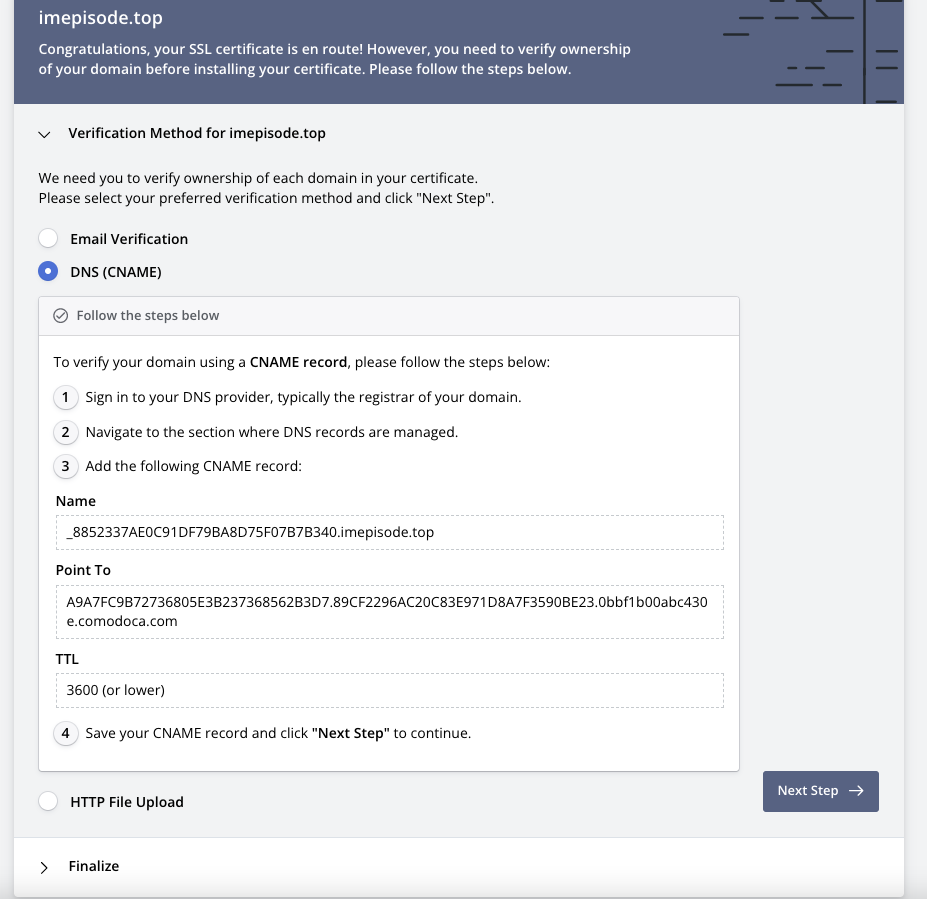 DNS CNAME认证方式
之后点击Next step会进行验证,通过之后显示如下:
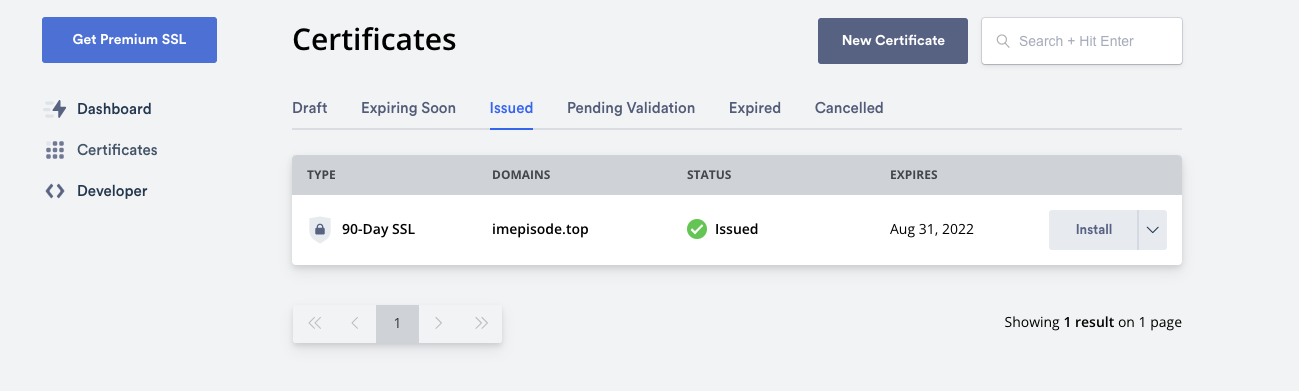 认证通过
认证通过
延伸阅读
1.https://github.com/acmesh-official/acme.sh/wiki/说明
2.https://github.com/acmesh-official/acme.sh/wiki/dnsapi
3.https://github.com/acmesh-official/acme.sh/wiki/Change-default-CA-to-ZeroSSL
4.https://github.com/acmesh-official/acme.sh/issues/3472
5.https://zerossl.com/letsencrypt-alternative/